Ark Survival Evolved How To Create Your Own Server
ARK is one of those games where the community you play with on a server makes all the difference in your experience. If you're tired of playing on public servers where other people set the rules, consider creating your own ARK server. Once you're done, you can customize your experience, invite friends, and run things exactly the way you prefer.
What is an ARK Server?
An ARK server is basically a computer that contains an instance of ARK: Survival that other people can connect to and play on. Wildcard hosts its official servers that anyone can join. Many people host their servers and leave them open to the public as well.
Some people choose to run private, password-protected servers that require authentication to join or local servers only on their local machine.
An ARK Server is set up to run a specific instance of ARK. With ten official maps and several others that are fan-made, many people choose to run a few different servers to have one on Ragnarok and one on Extinction, for example.
That's what I do with my servers so that if I want to experience post-apocalyptic vibes of Extinction, I can get on one server, and if I want a more nature-oriented experience, I can get on the other.
What Kinds of ARK Servers are There?
There are two kinds of ARK servers that you can make: a personal one on a machine you own or a rented one through a game hosting company. There are a few benefits of each one.
Personal Server
As long as you already have the equipment, a personal server is free. Dedicated servers are not incredibly difficult to set up or maintain as long as you can meet the required specifications with what you already own. They do need you to have a strong Internet connection if you want other people to have a smooth experience.
Rented Servers
Rented servers remove all the work involved in setting up your own ARK server. You simply choose a hosting company, determine which map or maps you want to have a server for, and pay for the number of players you want — in addition to other choices.
Here are a few things you'll have to consider if you want to rent a server:
- Price: The cost of an ARK server can go up very quickly, especially if you're looking to host more than ten people. For example, running two servers for 60 players each can cost around $600-700 per year just for the slots and servers.
- Up-time: You want a host that advertises a high percentage of up-time. There's no point in paying for a service that experiences frequent failures.
- Server location: You want a site that's suited for you and your players. Even though I'm on one side of the USA, I chose a sever with central locations because many of my friends play from other places. They recommend choosing a server within 500 miles of where you'll be playing, if possible.
- Bandwidth: The more bandwidth, the better.
- DDoS protection: Look for a company that offers servers that protect against this kind of attack so that your game safe from DDOS attacks.
Look through a few different server companies before choosing one if that's how you decide to make your ARK server. Many of them also offer discounts if you pay by the year rather than by the month.
Host Your Server
Hosting your server is easy as long as you have the hardware and a bit of software knowledge.
Requirements For ARK Server Machine
Basic Requirements:
- OS :A dedicated ARK: Survival server will only run on a 64-bit Windows system.
- Processor :At least 2 cores running at 3.0GHz, but more is better, especially with additional players and mods. Physical Quad Core CPU recommended.
- Memory :6GB of RAM for the server to start. You will need more as the number of players increases. Mods can also increase the amount of RAM required.
- UDP 27015
- UDP 7777
- UDP 7778
- TCP 27020
- Microsoft Visual C++ 2013 Redistributable
- Latest DirectX-Runtime package.
- You can find both of these in your Ark Server Dedicated Server folder under the _commonredist folder once you've installed the Server.
- Network bandwidth:A strong network connection. You probably won't want to host for others unless you have 100+Mbps.
- Open Ports:Open ports for incoming connections. You should open the following ports in your router software:
- Common Redist:
You will have to open additional ports if you're hosting more than one server. The more players and mods you have, the better hardware you'll need to have available to host them.
How to Make an ARK Server
There are a few steps on the path to hosting your own ARK server. You have to install the Steam server software, work with it to get the ARK server started, and then configure it to be discoverable.
SteamCMD
SteamCMD is short for Steam Console Client. It allows you to create and update ARK server installations.
- Open the drive where you want to install SteamCMD.
- Right-click in the blank space, hover over "New," and click "Folder."
- Type "SteamCMD" as the folder name.
- Download SteamCMD.
- Extract the ZIP file to the newly created SteamCMD folder.
- Double-click "steamcmd" executable to run the file.
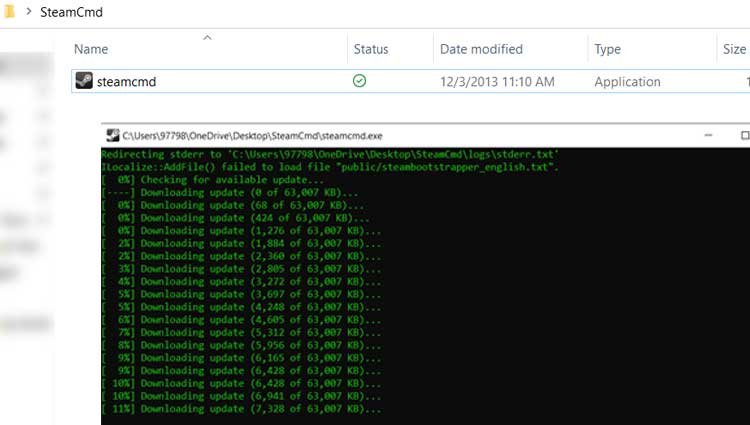
- Let the file run. It may take a few moments.
- Type "Quit" and press Enter to exit when it's complete.
ARK Dedicated Server Installation
Once SteamCMD is installed on your machine, it's easy to download the ARK: Survival Evolved Dedicated Server files.
- Open the drive where you want to store your ARK files. You'll need at least 15GB of space but should have more if possible for future updates and saves.
- Right-click in the blank space, hover over "New," and click "Folder."
- Type "ARK Server" as the folder name.
- Open "steamcmd" executable from the SteamCMD folder.
- Type "
login anonymous" and press Enter. - Type "
app_update 376030 validate" and press Enter.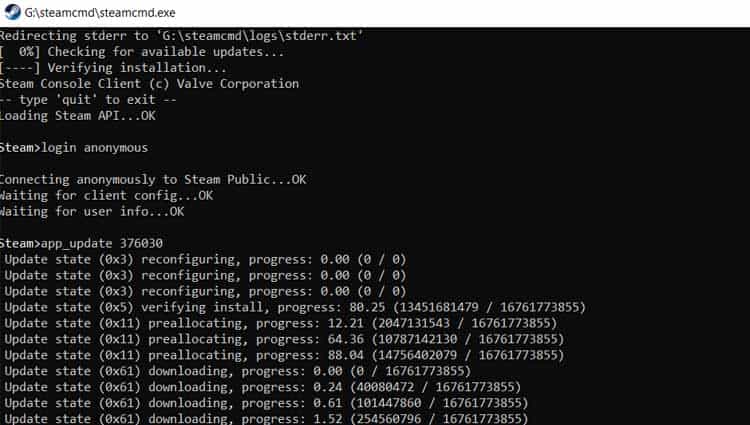
- Open the "steamapps" folder in your SteamCMD folder. Open "common." You'll see the ARK Survival Evolved Dedicated Server folder there once the installation finishes.
Now the data you need to run your own ARK dedicated server is available on your machine.
Setting Up the Server
In this example, we'll set up a server for Ragnarok. You will want to replace the word Ragnarok with the name of the map you're using if you prefer a different map.
- Open the ARK Survival Dedicated Server folder.
- Open "ShooterGame."
- Open "Binaries."
- Open "Win64."
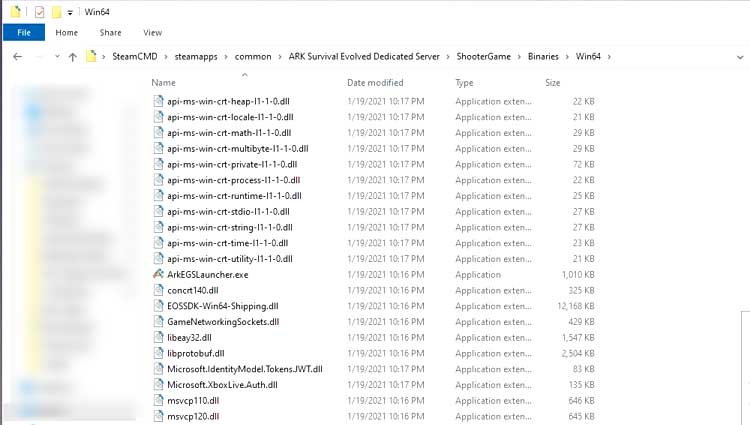
- Click "View" at the top and make sure that "File name extensions" are checked.
- Right-click in the blank space, hover over "New," and choose "Text Document."
- Name the text document "Start_Ragnarok.bat."
- Click "Yes" to confirm you want to change the file name extension.
- Right-click the text document and choose "Edit." It should open in Notepad.
- Type the following text into the Notepad document.
start ShooterGameServer.exe "Ragnarok?SessionName=ServerName?MaxPlayers=30?OverrideOfficialDifficulty=5.0?DifficultyOffset=1.0?AltSaveDirectoryName=Ragnarok?QueryPort=27015?ServerPassword=MyPassword?ServerAdminPassword=AdminPassword?Port=7777?listen" -NoBattlEye -NoTransferFromFiltering -clusterid=tree1235327 -activeevent=none -noundermeshkilling -crossplay
Here,- You can change Ragnarok to another map name if you want to use a different map.
- You can adjust the number of players as desired.
- You can change the session name by replacing the text "ServerName" with your input.
- You can change the difficulty level and offset as desired. The ones above are what they use on official servers.
- The AltSaveDirectoryName can be changed to anything you want. It's the save folder for the server. I prefer to name them after the map, as above.
- Change "MyPassword" and "AdminPassword" to the passwords you prefer to use. If you don't want to set them, you can remove "ServerPassword=MyPassword? and ServerAdminPassword=AdminPassword?" from the command.
- Type -NoBattlEye if you prefer to avoid the problems that come with BattlEye. Sometimes the program can work well, but some server owners have found issues with it.
- You can remove "-NoTransferFromFiltering" and the cluster ID information if you aren't planning to cluster multiple servers. If you are, create your unique cluster ID in place of the example one.
- The activeevent entry is for when you want to include an event on the server. It's worth having on there, even if you aren't planning on activating an event right now. When it says "none," it means none is active. Change "none" to the event's name when one is happening if you want to host it.
- The noundermeshkilling entry turns off anti meshing player kills but still allows teleporting. You can include or remove it as desired.
- The crossplay entry allows people playing on Epic Games to join your server. Remove it if you don't want crossplay.
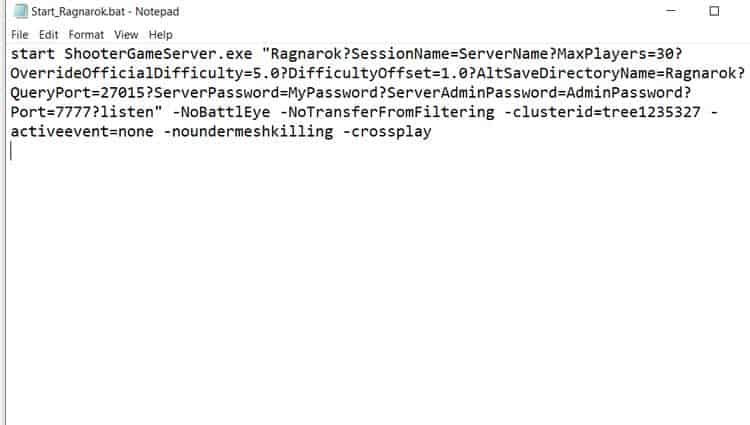
- Save the Notepad document.
- Double-click "Start_Ragnarok.bat" to start the bat file.
- Wait while it loads. It may take a while. You'll know the server is up when you open the folder "Saved" in the directory "ShooterGame" and see a new folder with the name you specified in the .bat has appeared. Remember that the Saved folder won't appear until you start the server process.
Your server is now up and running. The next step is being able to join it.
Joining Your Server
Once your server is working, you have to join it. This is an excellent step to take even if you don't want to play right away because you want to make sure that the server is working and that you can connect to it.
Local Host
- Click "Servers" at the top of your standard Steam client window.
- Click the "Favorites" tab.
- Click "Add a Server."
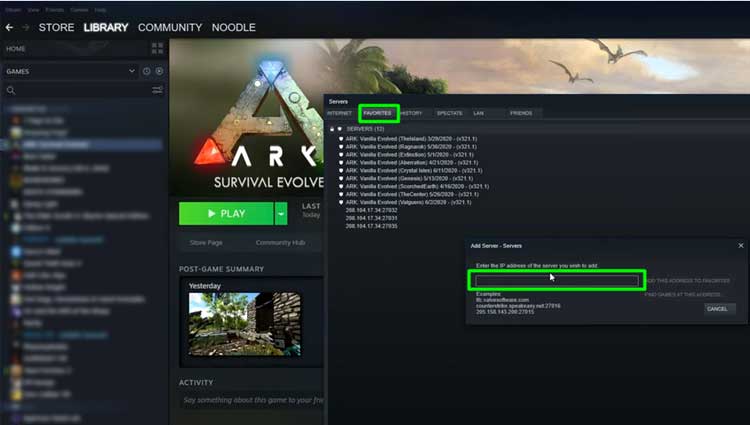
- Type "
localhost:27015". - Click "Add This Address to Favorites."
- Click "Refresh," and your server with the name you specified should appear in the list. In case if you still cannot find your server, then follow the steps below for Private IP.
Private IP
- Click "Servers" at the top of your standard Steam client window.
- Click the "Favorites" tab.
- Click "Add a Server."
- Click the Windows Start Button.
- Type "cmd" and click to open a command prompt window.
- Type
"ipconfig"and press Enter. You'll see your local IP address. You can return to the servers window and try adding that as a server address as well.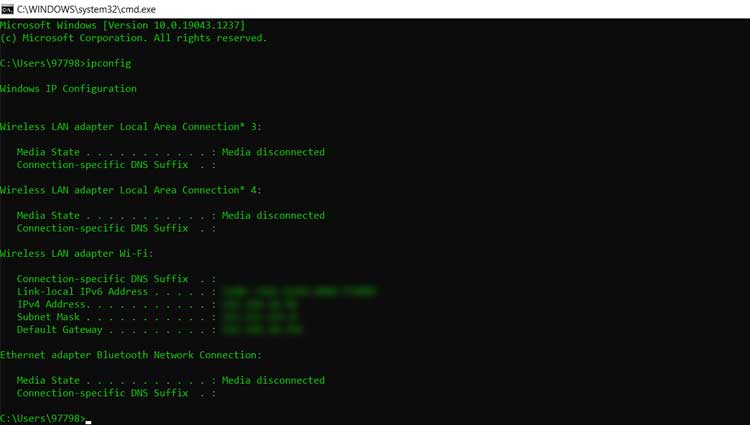
- Click "Refresh," and our server with the name you specified should appear in the list. If it is still not there, then carry on with the Public IP.
Public IP
- Click "Servers" at the top of your standard Steam client window.
- Click the "Favorites" tab.
- Click "Add a Server."
- Go to a public IP finder.
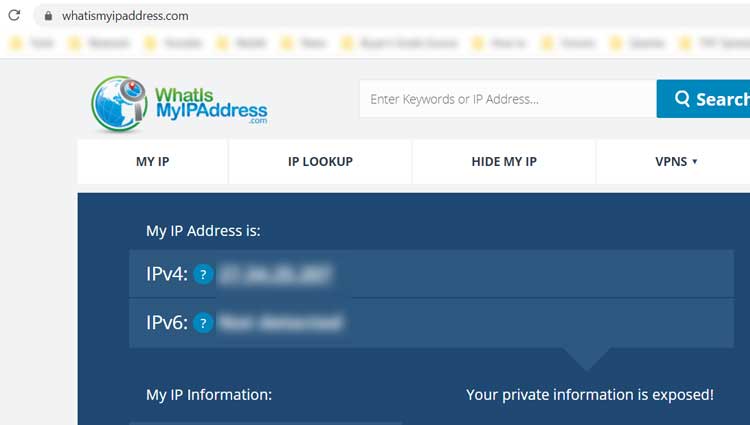
- Put your public IP address in the server entry area.
- Click "Add This Address to Favorites."
- Click "Refresh," and our server with the name you specified should appear in the list.
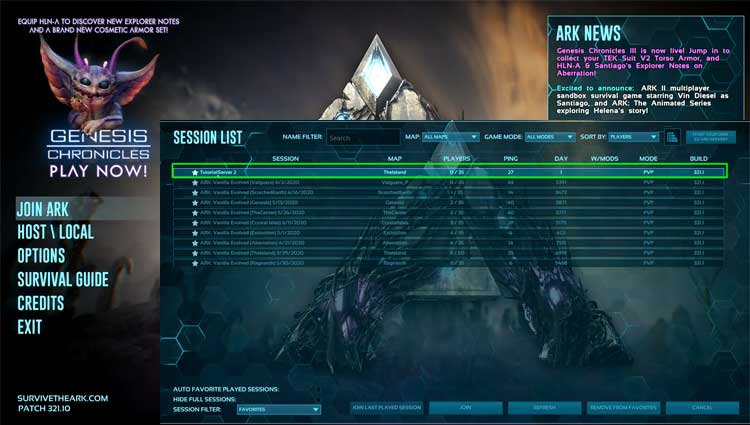
Once you have your server saved to your favorites, open ARK: Survival. Once it's open, click "Join ARK" and join the server you made from your Favorites menu in-game.
Additional Information
There are a few other things you need to know to run a dedicated ARK server.
Closing the Server
When you're not using the server, simply close the server window to remove any access to it. You and others will regain access once the server is reopened by double-clicking your .bat file again.
To be safe, use the "saveworld" admin command in-game to ensure everything is backed up before closing your server. Remember to type "enablecheats AdminPassword" to enable admin commands before saving.
Opening the Server IP
If you can't find your server by searching the server name on Unofficial in-game Servers, you need to change settings in-game.
- Open ARK: Survival.
- Click "Host/Local" and select your map, then choose "Play Single Player."
- Press "Tab" to open the console once the game loads.
- Type "
Open ServerIP" where ServerIP is replaced with the IP address of your server. You should use your public IPv4.
Other players should join by finding it in the list of Unofficial Servers after it appears. Be sure to have them add it to their favorites.
Map Names
The official map names you should use when setting up your server are:
Make sure to use the correct names when setting up your .bat file.
Updating Your Server
Whenever ARK updates, you must update your server, or players won't be able to join. Keep an eye on your Steam downloads to see when ARK updates.
- Open SteamCMD.
- Type
"login anonymous"and press Enter. - Type
"app_update 376030 validate".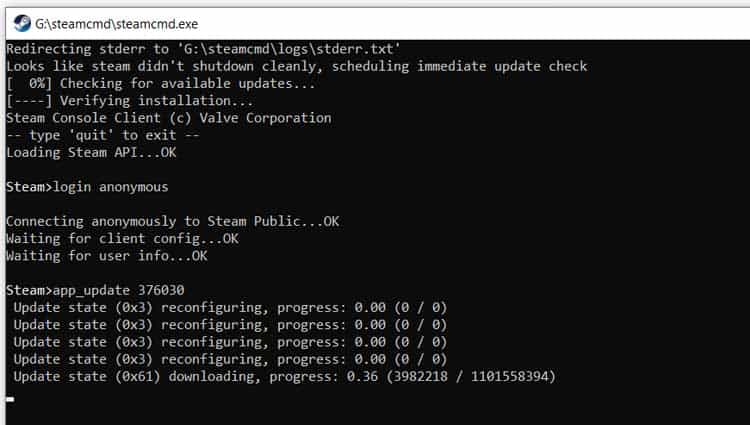
- Press Enter and wait until it finishes to use ARK.
Once you have your ARK server up, people should be able to join you and your friend as long as you've opened the required ports and the server is appealing in the list. You can configure your server to change many different world settings, add mods, or determine which dinosaurs spawn.
Running your own dedicated ARK server gives you much more control than merely playing on someone else's.
Also, follow our detailed guide for any Crash Related Issue in ARK.
Ark Survival Evolved How To Create Your Own Server
Source: https://www.technewstoday.com/how-to-make-an-ark-server/
Posted by: murphyussighboult1999.blogspot.com

0 Response to "Ark Survival Evolved How To Create Your Own Server"
Post a Comment